Quickstart
The Succinct Prover Network enables seamless proof generation with zero setup, providing instant access to GPU clusters for the lowest latency and cost.
Step 1: Requester Key Setup
The Succinct Network uses Secp256k1 key pairs for authentication, similar to Ethereum wallets. You can either generate a new key pair or use an existing one. Foundry and Metamask are two easy ways to generate a new key pair.
For simplicity, we will refer to this key pair as your requester account.
- Foundry
- Metamask
Prerequisites
Install the Foundry CLI if you haven't already:
curl -L https://foundry.paradigm.xyz | bash
foundryup
Create a New Key Pair
You can generate a new Secp256k1 key pair by running:
cast wallet new
This command will give you an output similar to this:
Successfully created new keypair.
Address:     0x7594cF2161dC345B300A5Ac87e2473c7bF25D9fe
Private key: <PRIVATE_KEY>
Create a New Key Pair
If you don't have Metamask, download it and follow the setup process. This will create a new key pair for you.
If you already have Metamask installed, you can create a new key pair by following Metamask's account creation instructions.
Export the Private Key
To export your private key from Metamask:
- Make sure you have selected the account you want to use with the prover network.
- Follow Metamask's private key export instructions.
- Copy the displayed private key.
In Step 4, you will set the NETWORK_PRIVATE_KEY environment variable to this private key value.
Step 2: Acquire PROVE
When requesting proofs on the Succinct Prover Network, you must pay for them with the PROVE token using your requester account.
You can get PROVE on Ethereum Mainnet through any of the options listed in the Token Overview.
Step 3: Deposit PROVE
Next, you need to make sure your requester account has a sufficient PROVE balance in the Succinct Prover Network to pay for proofs.
Option 1: Deposit with Requester Account
If you used your requester account to get PROVE on Ethereum Mainnet, you can connect it to the Succinct Explorer and deposit PROVE into the Succinct Prover Network.
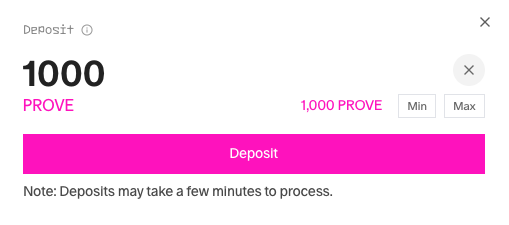
To deposit:
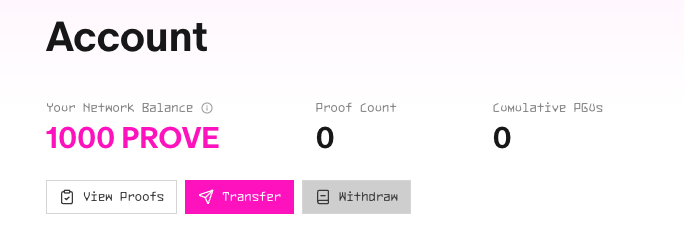
- Go to the Account page on the explorer.
- Click on the "Deposit" button and confirm the amount of PROVE to deposit.
- Complete the deposit by confirming the permit and transaction signatures in your wallet:
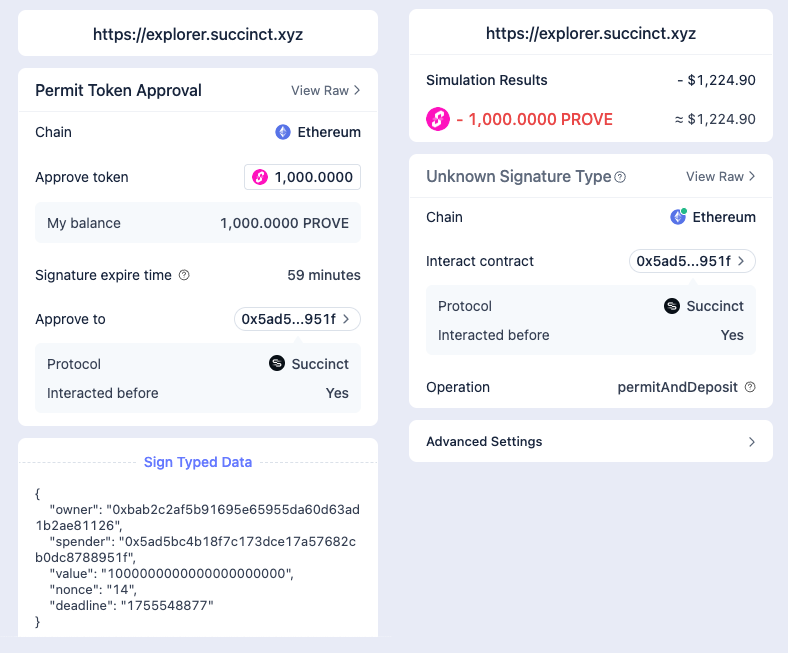
After the deposit is indexed (which can take up to 5 minutes), you will see your network PROVE balance update in the Account page, and are now ready to request proofs on the network.
Option 2: Deposit and Transfer to Requester Account
If you have PROVE on an account that is not your requester account, you can leverage the network's "Transfer" functionality:
- First, deposit PROVE with your account that has PROVE on Ethereum Mainnet (similar to Option 1).
- Wait for the deposit to be indexed (which can take up to 5 minutes).
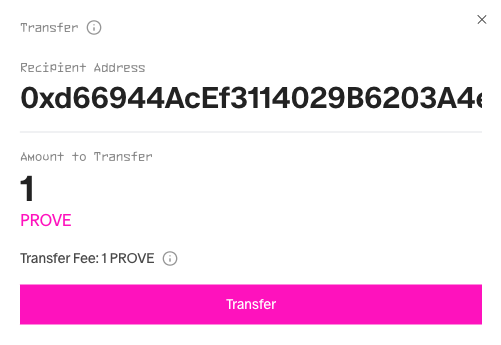
- Click the "Transfer" button. Then, enter the address of your requester account and the amount of PROVE to transfer.
Once the transfer completes, you're ready to request proofs on the network.
Step 4: Request Proofs
To request proofs on the Succinct Prover Network:
- Make sure to use sp1-sdk >=
v6.1.0 - Set the
NETWORK_PRIVATE_KEYenvironment variable to your requester account's private key (from Step 1)
use sp1_sdk::{
  include_elf, network::NetworkMode, utils, Elf, ProveRequest, Prover, ProverClient, SP1Stdin,
};

/// The ELF we want to execute inside the zkVM.
const ELF: Elf = include_elf!("fibonacci-program");

#[tokio::main]
async fn main() {
  // Setup logging.
  utils::setup_logger();

  // Create an input stream and write '500' to it.
  let n = 1000u32;

  // The input stream that the program will read from using `sp1_zkvm::io::read`. Note that the
  // types of the elements in the input stream must match the types being read in the program.
  let mut stdin = SP1Stdin::new();
  stdin.write(&n);

  // Create a ProverClient to interact with the Succinct Prover Network.
  let client = ProverClient::builder().network_for(NetworkMode::Mainnet).build().await;

  // Generate the proof for the given program and input.
  let pk = client.setup(ELF).await.unwrap();
  let _proof = client.prove(&pk, stdin).compressed().await.unwrap();
}
The output should look something like this if you run the code above:
2026-03-24T00:27:29.421648Z  INFO requesting proof from network mode=Compressed
2026-03-24T00:27:31.702617Z  INFO Registered program 0x5252c4ad36f7242955971bee73dd21bc48adf9a34c220db06de4c4f562ba0cac
2026-03-24T00:32:34.328049Z  INFO public_value_stream: [232, 3, 0, 0, 77, 23, 0, 0, 67, 14, 0, 0]
2026-03-24T00:32:34.328494Z  INFO execute_program: close time.busy=2.09ms time.idle=3.55ms
2026-03-24T00:32:34.768097Z  INFO Requesting proof:
2026-03-24T00:32:34.768150Z  INFO ├─ Strategy: Auction
2026-03-24T00:32:34.768159Z  INFO ├─ Proof mode: Compressed
2026-03-24T00:32:34.768163Z  INFO ├─ Circuit version: v6.1.0
2026-03-24T00:32:34.768167Z  INFO ├─ Timeout: 300 seconds
2026-03-24T00:32:34.768173Z  INFO ├─ Public values hash: 0xeb61af091de14d64211b5f413bbb0da5a66e3de8cec2cb754b1fc56f8b0b2189
2026-03-24T00:32:34.768180Z  INFO ├─ Base fee: 200000000000000000 (0.2000 $PROVE)
2026-03-24T00:32:34.768186Z  INFO ├─ Max price per bPGU: 2000000000000000000 (2.0000 $PROVE)
2026-03-24T00:32:34.768190Z  INFO ├─ Minimum auction period: 0 seconds
2026-03-24T00:32:34.768193Z  INFO ├─ Prover Whitelist: Some([0xd4fcfce0dee91a9895c3ad71a6248d57c287a4f5, 0xb3780a2bbbc20a36c86da1bf4fa0b0d3c4b60dcf, 0x5a00604bf1832e79713aba108622c18a1f1a4349])
2026-03-24T00:32:34.768418Z  INFO ├─ Cycle limit: 14619 cycles
2026-03-24T00:32:34.768436Z  INFO └─ Gas limit: 16404 PGUs
2026-03-24T00:32:36.781092Z  INFO Created request 0x0c641d1a0a4937ef4e6e59accfa3a59bfd193749f4b9db66a82d08737ab62f3b in transaction 0x85dd36ed9c0a42590cf7c28023b3f4d9d103c62cc631c09cd271b2285d6f0103
2026-03-24T00:32:36.781125Z  INFO View request status at: https://explorer.succinct.xyz/request/0x0c641d1a0a4937ef4e6e59accfa3a59bfd193749f4b9db66a82d08737ab62f3b
2026-03-24T00:32:51.952417Z  INFO Proof request assigned, proving...
The first time you request a proof for a specific ELF / proving-key pair, your program will be automatically registered on the prover network.
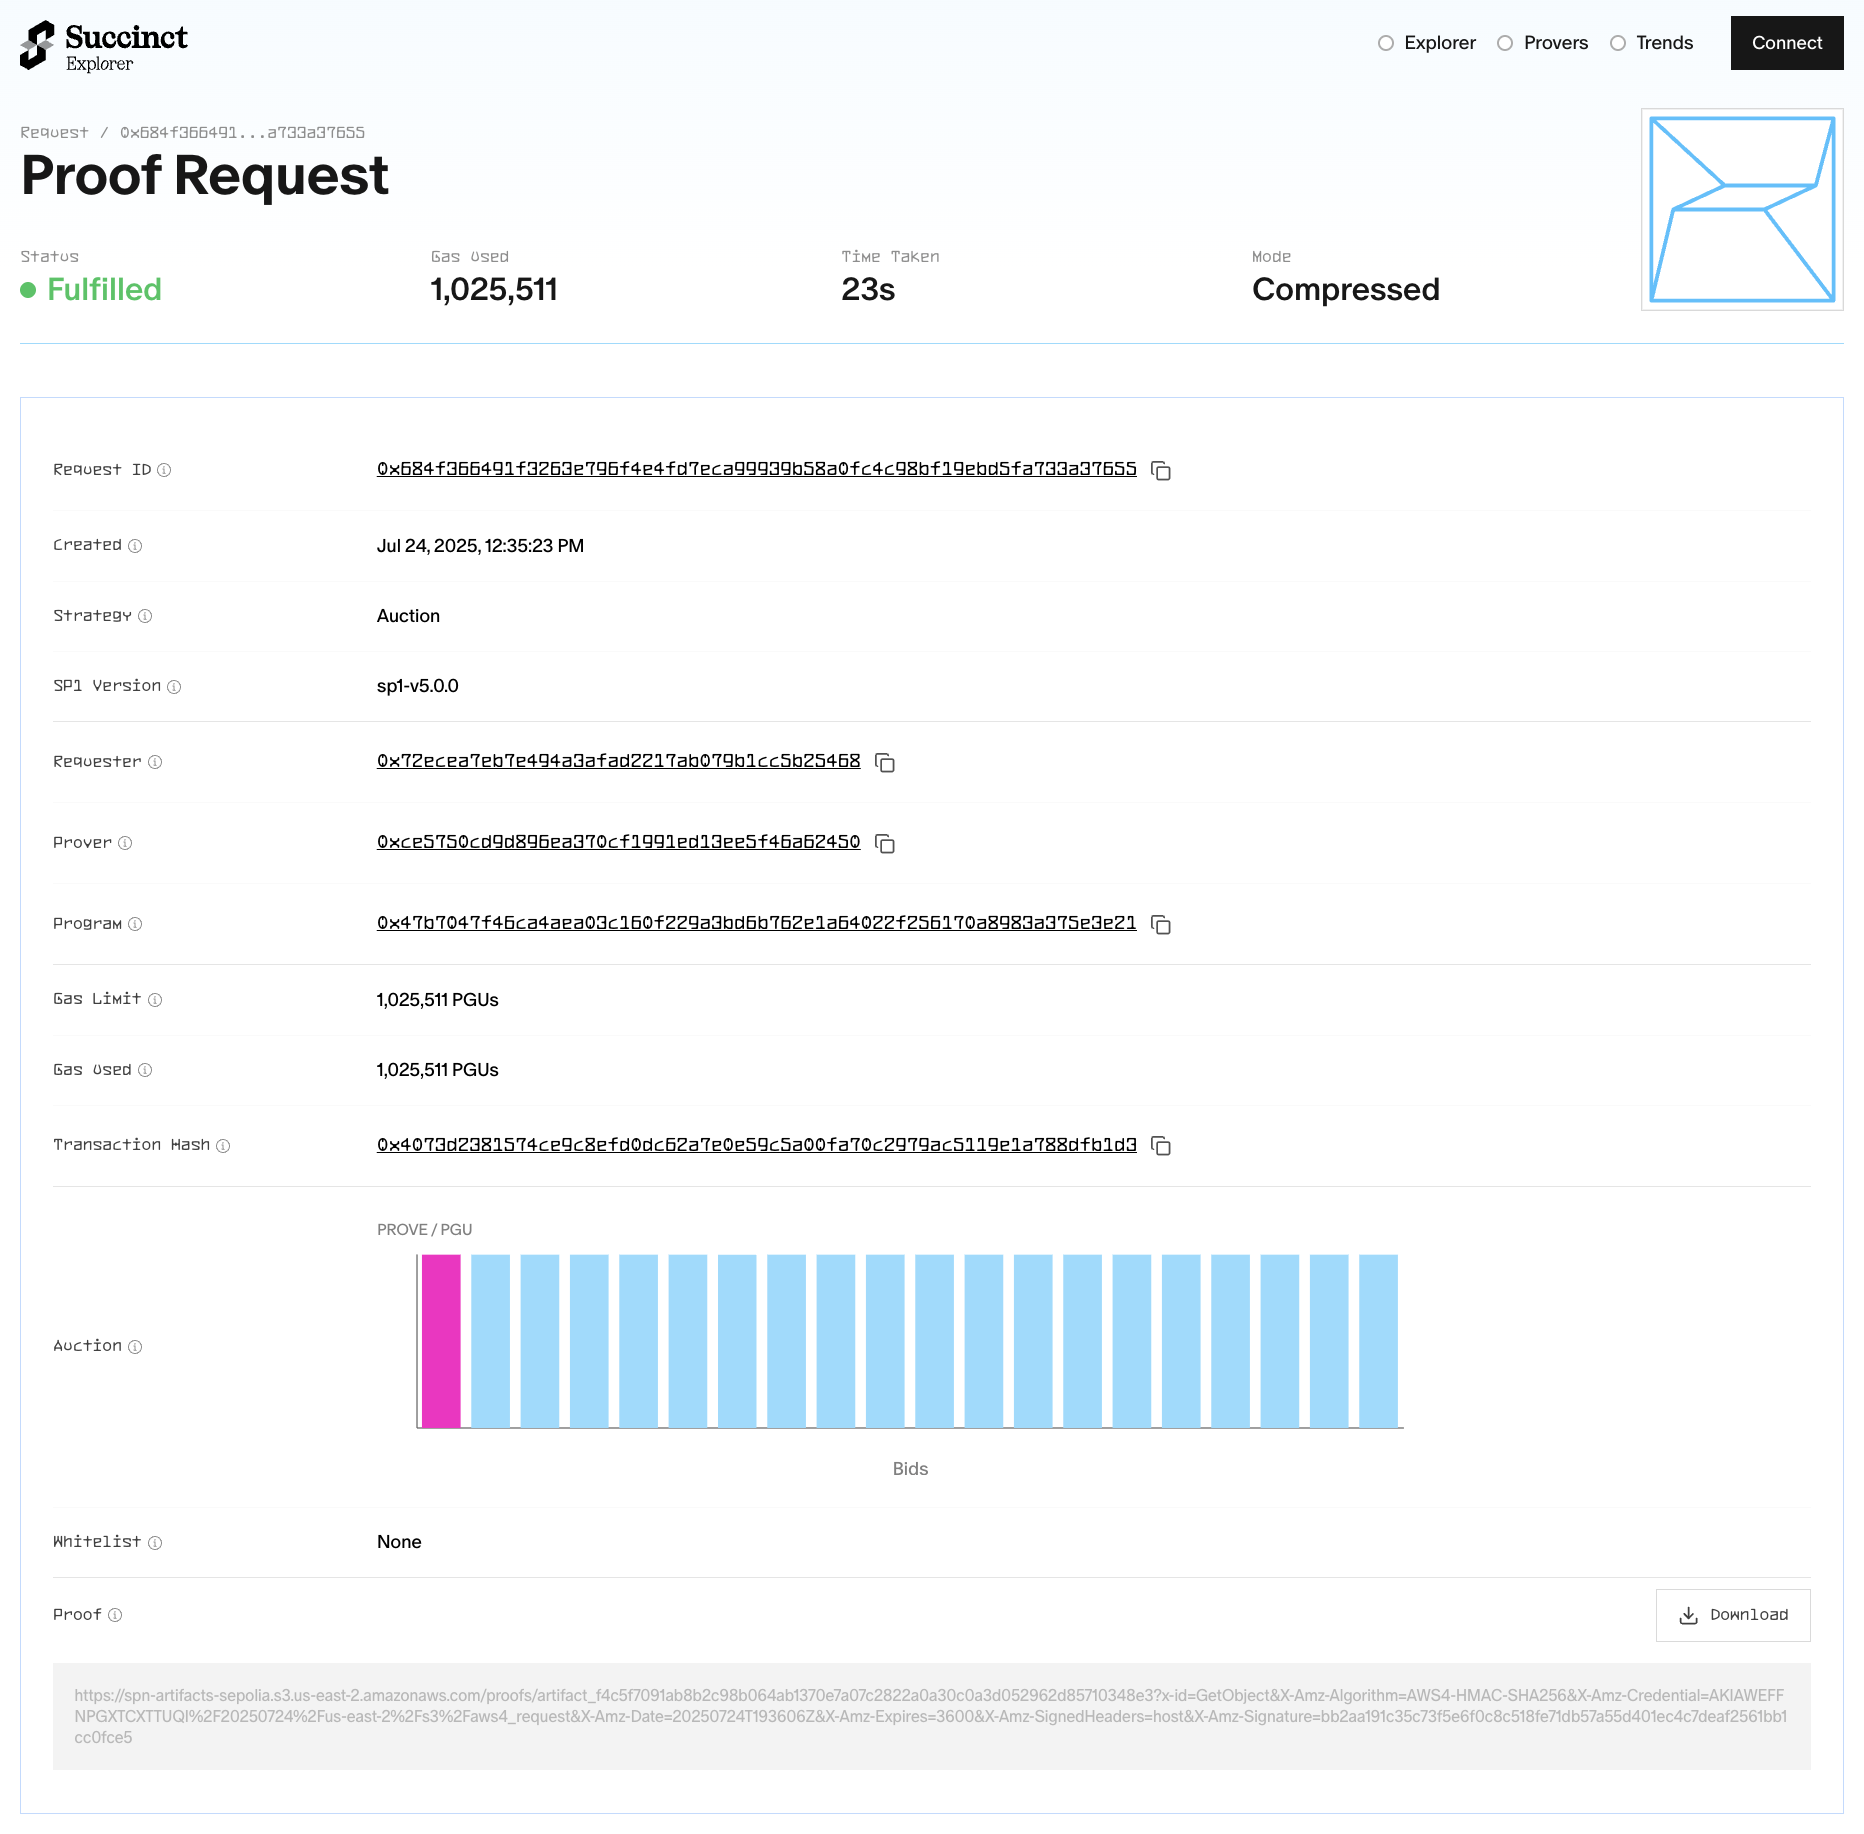
View Proof Status
Monitor your proofs on the explorer. Each proof page shows:
- Current stage and status
- Cycle count used
- Verification key details
- Prover assignment information
Proof Request Configuration
In the above example, we used the compressed proof mode, but you can specify any of the supported proof types based on your use case.
There are other configuration options, like auction parameters and timeouts, that use default values when not specified. Please see the Advanced Usage section for details on how to configure these parameters.
Support
Need help getting started? Visit succinct.xyz for assistance with onboarding.